Uncategorized

Guest Design Post – 3 different Projects Part – 2

Hello Everyone,

Zalak here back again with the second part of my continue project. You can check first part here.

https://madrasbazaar.wordpress.com/?p=1610

So let’s start with another two project.

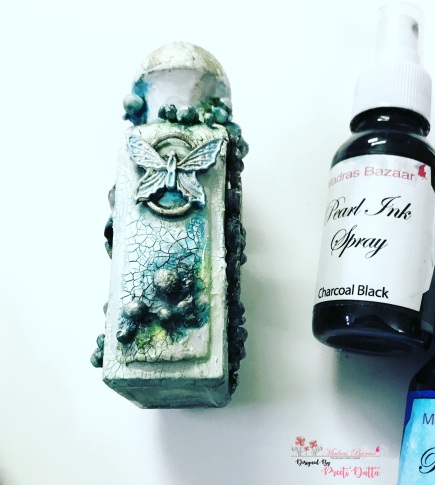
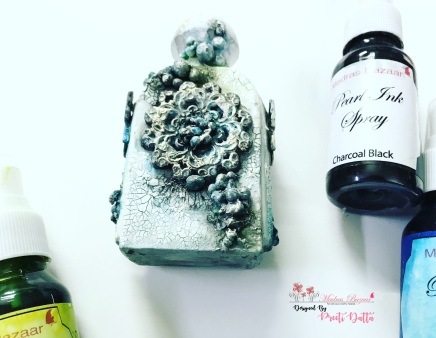
2. Mixed Media Frame

DSC02468DSC02469DSC02471DSC02472

Brief Info about Frame:

  • I have started with rectangular canvas, adhered some Popsicle Sticks, Butterfly, Swirl MDF cutout and some glue drops.
  • Once everything is dried, I have applied gesso, each and every corner.
  • Awaiting Gesso to dry (phewww…..), after 15mins, I have first take some black acrylic paint, applied over left top and right bottom corner.
  • Then start spraying Pearl Ink Spray –  Glooming Pinkover black acrylic paint. And from Right top corner to left bottom corner, I have sprayed Pearl Ink Spray – Neon Carrot. (It’s an Alcohol, I sprayed three to four times after every coat dried).
  • To finish my frame, I have sprinkle some Mermaid Crystal Powderand adhered chipboard sentiment middle of butterfly.

3. Scrapbook Layout

DSC02480DSC02474DSC02483DSC02476DSC02478

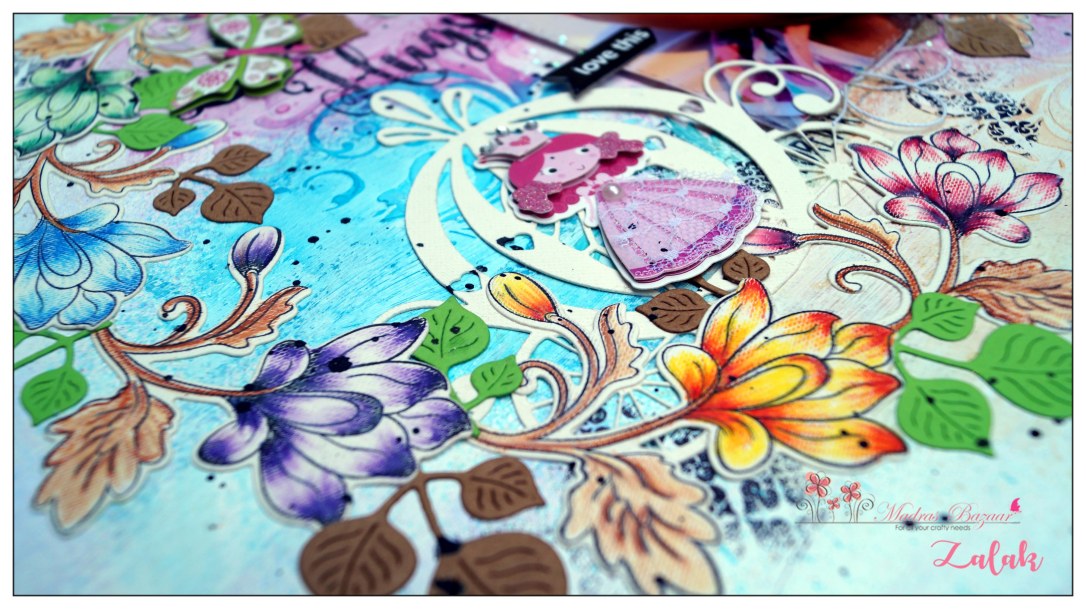
Brief about Scrapbook Layout:

  • I have started with some plain background pattern paper, and distressed it’s edges with scissors.
  • Applied clear gel so that I can work on paper, once it is dried I have used Gesso and dry brush around my layout then I had take some stencil and applied embossing paste.
  • While layout was drying, I have stamped some Altenew Persian Motif Stamp Set on white CS and colored it with Steadler Luna pencils.
  • Die cut Stamped images, some leaves from brown and green CS.
  • Once the embossing paste was dried, I have started spraying Pearl Ink Spray – Neon Carrot, Glooming Pink, and Pacific Blue in a circle shape.
  • Then waiting for inks to dry naturally, I took my daughter photo and adhere it on scrap pieces of corrugated cardboard.
  • Now it’s dried completely. It’s time to finish my layout. I have started with photo, adhered it to a right side of a layout. Stamped some sentiments and pattern here and there.
  • Then started attaching stamped images, leaves, some butterflies, chipboard cutout and finish my layout with some Mermaid Crystal Powder around photo.

So, that’s all from me today. I hope you all liked my project and share some love in a comment box.

Thank you for Stopping by.

Love,

Zalak

november, Pearl Spray

Guest Design Post : 3 different Projects PART 1

Hello Everyone,

Happy Morning! We have a new Guest Designer for you today. We hope you will join us in welcoming her and be inspired to try out some of the beautiful projects shared by her.

Zalak A Mandal


Zalak badge copy

Blog : handmadecardsbyzalak.wordpress.com

Instagram : https://www.instagram.com/thecardshopstudio/

Website : http://www.thecardshopstudio.com

I Zalak A Mandal today over Madras Bazaar Blog. Hope you are having a great week. I would like to thank Manisha (amazing personality, and owner of Madras Bazaar) for inviting me to be a Guest Designer.

A little about myself, my native is Ahmedabad, Gujarat. Presently staying in Chennai, Tamil Nadu since past 5 years. I am a wife to an Aircraft Maintenance Engineer and a mother to a beautiful daughter. I started crafting with Quilling, then I have spread my wings into card-making, stamping, water-coloring, decoupaging and many more. I am known for my thoughtfully design, quality and the finishing in my handmade cards, scrapbook albums, mixed media, shadow boxes, organizers. Even though it is turning from my passion to profession, I have same enthusiasm and zeal to learn and innovate more and more through crafting and designing. 

I have total Three Projects to share with you all today, So let’s get started.

1. Christmas Card

DSC02463DSC02465DSC02466DSC02467

Brief about Card:

  • The Card measures 5×7 inches, I have used watercolor CS for background.
  • I have started spraying Pearl Ink Spray – Pacific Blue and randomly applied with wide paint brush.
  • While It was drying, I have cut some hills with border dies from white CS and write sentiment using black brush pens.
  • Once the background is dried, I splattered some white acrylic paint using paint brush to make background to look a like winter snow.
  • Then I have started assembling my card, first I have taken blue side folding CS and adhered watercolor background.
  • Then on background, I have adhered hill, lamp post and reindeer which is heat embossed with white embossing powder.
  • To finish, I have make some stars using white gel pen.

To be continue……. Part 2

So, that’s all from me today. I hope you all liked my project and share some love in a comment box.

Thank you for Stopping by.

Love,

Zalak

baby, november, Uncategorized

Baby Album with Cute Baby Charms

Hello lovely people
I’m Riddhi and sharing my DT project with you all.
I made baby album this time and I used amazing cute little charms and flower from the store.
They have amazing collection of charms and emblishments.
So here is the glimpse of my project.

image1image2image8image5image6

Products Used

Blue Baby Charm set

Beautiful Rocking Horse

Silk plum blossom

Alloy Enamel Lollipop Charm

Love,

Riddhi

GDT, Pearl Spray, Uncategorized

Guest Design Post (Part 2): Altered Perfume Bottle By Preeti Datta

Hi friends 🙂

Preeti D. (aka Dutt Preety) here. This is my second Guest Design Post for Madras Bazaar. In case, you’d like to check out Part 1, please click HERE. I’ve used the Madras Bazaar Pearl Ink Sprays here. These are alcohol based, so for blending the colors, you will need the blending solution. These dry fast and give a shimmery look to the project.

I’ve created a Mixed Media Altered Perfume Bottle for you today. I had a lot of fun making it, so let’s get started.

Altered Perfume Bottle

Here are a few photos of the project:

3

1

4

5

6

7

9

Process:

Slideshow: Photo Tutorial

This slideshow requires JavaScript.

  1. Took an empty perfume bottle and applied 2 coats of heavy white gesso on it to prep the surface
  2. Using 3D matte gel adhered a few metal charms to the bottle.
  3. Applied white crackle paste to the bottle and let it air dry so as to get the desired crackle effect
  4. Added art stones at some places using 3D matte gel & brushed on some white gesso on the charms and art stones
  5. Once everything was dry, applied color using 3 of the Pearl Ink spraysCharcoal Black, Vibrant Green & Shock Blue
  6. To finish the project, applied a little Opal Magic Wax to some of the raised surfaces using my fingers.

That’s all for today.

Thanks a lot for having me as a Guest Designer 🙂

Hope you liked my little project dear friends.

Thanks for your precious time 🙂

Stay Blessed!

Preeti D. 

Preeti Badge copy